by Clara Rutherford
There are basically two ways to make simple hats: crochet in the round, and crochet a rectangle, stitch the sides together, then gather the top. There are quite a few complicated ways to crochet hats, too, but frankly, I'm shooting for simple, myself....
First things first: sizing. You need to have a ballpark idea how big around the destination head is! Adult male braincase: generally around 22" to 23" circumference. It's a little more important to get close to the right head size when making hats for babies. Nobody's gonna want their soft little head squashed up to fit in a too-small hat! One of my fave sites for sizing information: Bev's Country Cottage, which gives circumferences and hat depths for everyone from preemies to adults.
Okay, so, now you've figured out the circumference. Time to decide on the look: smooth-fitting watch cap style, or traditional big ol' puffy-top? The latter choice, Ol' Faithful Puffy-Top, is probably the easiest hat on the planet, short of an old pillowcase, or a sack. You just need to make a rectangle that meets the required dimensions, for example, if the hat needs to be 21" circ and 11" deep, you make a 21" x 11" rectangle. Then, you bring the short edges together, sew or crochet them up to form a tube, run a strand of the yarn around the top of the tube, gather it up, and tie it off. Voila! Ze Puffy-Top!
If you're needing a watch cap -- called by the trendy of today a "skully" though it's seldom if ever shaped like a real skull -- you need to follow a different Way.
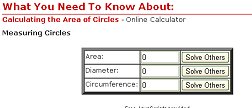
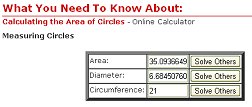
You need two numbers, to begin: the finished circumference of the cap, and the diameter you'll need to achieve said circumference. I use the Calculating the Area of Circles on About.com. In the 2 screen caps below, you'll see what the basic calculator looks like, then what happens when you plug in your circumference.
I typed in "21" in the circumference box, and hit the "Solve others" button. So, to make a hat that's 21" in circumference, I need a circle that's just over 6.5" across. With me so far? Of course you are.
Now, to the pattern. For most hats, I use a worsted weight yarn, and an H hook. The instructions are:
Abbreviations: CH = chain stitch; SL = slip stitch; SC = single crochet; DC = double crochet. I'm American, thank y'very much, and these instructions are in American stitching.... ;D
Row 1: CH 3. In 3rd chain from hook, work 11 DC. Join with SL to top of CH 3. You should have 12 stitches.
Row 2: CH 3. This counts as beginning DC now and throughout. In the same space as the CH 3, work 1 DC. In each of the next stitches around, work 2 DC. Join with SL to top of CH 3. You should have 24 stitches.
Row 3: CH 3. In the same space as the CH 3, work 1 DC. * In the next stitch, work 1 DC. In the next stitch, work 2 DC. Repeat from * ending with 1 DC worked, then join with SL to top of CH 3. You should have 36 stitches.
Row 4: CH 3. In the same space as the CH 3, work 1 DC. * In each of the next 2 stitches, work 1 DC. In the next stitch, work 2 DC. Repeat from * ending with the second 1-DC worked, then join with SL to top of CH 3. You should have 48 stitches.
At this point, you might want to start measuring your diameter, if you're making a child-size hat....
Row 5: CH 3. In the same space as the CH 3, work 1 DC. * In each of the next 3 stitches, work 1 DC. In the next stitch, work 2 DC. Repeat from * ending with the second 1-DC worked, then join with SL to top of CH 3. You should have 60 stitches.
Row 6: CH 3. In the same space as the CH 3, work 1 DC. * In each of the next 4 stitches, work 1 DC. In the next stitch, work 2 DC. Repeat from * ending with the second 1-DC worked, then join with SL to top of CH 3. You should have 72 stitches.
This is usually as far as I go, with the increasing rounds, if I'm making a hat 21" in circumference. If you measure your diameter, and need to go wider, you can see the progression: each succeeding row, you ad one more DC in between the 2-DC places. For simplicity, I'm going to give the rest of the directions.
Row 7 (or whatever): CH 3. In next stitch, and all other stitches in the row, work 1 DC. Join with SL to top of CH 3.
Repeat this row until the hat is as deep as you want it to be. For a skully, at 21" circumference, I'd go a total of 8 rows, working without increases. For a, well, I guess we could call it a "mulder" (kinda a skully but longer and a little folded-up in places... lol), you could go more rows, which would give more of a watch-cap thing, folded up on itself when worn.
Finishing row: CH 1. In next stitch, and all other stitches in the row, work 1 SC. Join with SL to beginning CH-1. Tie off, and work the tails in. You can leave off the finishing row, if you like. I use it because it keeps the outer edge of the hat from loosening too much with wear, and falling off at embarrassing or inappropriate moments, like when planking or owling.
Hopefully, these directions make sense for you, and make good, easy hats for you.


Last updated 1 January 2020
Page and images copyright 2006-2020, With A Twist Creations.